Ratings, percentages, and more
rating: 7/8 slices

hydration: 71%
difficulty: moderate

Ingredient percents
| Ingredient | Standard % | Baker’s % |
| Flour (240g) | 55.97% | 100% |
| Salt (4.27g*) | 1% | 1.78% |
| Yeast (1.55g**) | 0.36% | 0.64% |
| Water (170g) | 39.64% | 70.83% |
| Olive Oil (13g) | 3% | 5.42% |
*I used this tool to convert 3/4 teaspoon salt to grams.
**I used this tool to convert 1/2 teaspoon yeast to grams.
Summary
- Start roughly 16-17 hours from when you plan to serve.
- Excellent, easy to follow instructions.
- Limited active time but does require your presence for several brief dough manipulations over the course of an hour.
- Given time requirements, probably best as a weekend or WFH pizza.
- Fold technique replaces kneading and yields a thick, yet light and delicate crust.
- Good on day one but better day two.
- Use all-purpose flour, don’t substitute here.
- A cast-iron skillet is ideal.
Recipe available on King Arthur’s website
Cooking
If you’re newer to baking (or outside the U.S.), King Arthur is a well-regarded flour company. According to Wikipedia, Henry Wood founded the company in 1790 in Boston, MA. I also really like their new logo – a great update! Let me know what you think in the comments.
I chose this recipe because if anyone has an incentive to come up with a good flour based recipe, it should be King Arthur. After all, aren’t the best chocolate chip cookie recipes are on the backs of chocolate chip bags? Plus, the folding-instead-of-kneading technique was new and interesting to me. To top it all off, the recipe won their 2020 Recipe of the year award. So, yeah, I thought this recipe should be a good one.
It didn’t disappoint. The instructions are well done. This made learning the new-to-me fold technique easy. And, what’s more, the fold technique actually made a difference! Per the description, the recipe’s creator introduced the fold technique to create air pockets in the dough. It surprised me how well this actually worked and would say that the fold technique is critical to creating the light and airy crust this pizza needs. Without the incorporation of air, you’d be left with a thick and dense crust.
While you probably won’t have an issue following the recipe, it does require you to be in and out of the kitchen a good deal at the beginning. You won’t need to work with the dough for more than a few minutes at a time, but it will take over an hour from when you start it to when you can put in the fridge for its 12 to 72 hour rise.
I picked up some new pro tips from this recipe, like wetting your hands before going in for the folds. A little counter intuitive to me, but it kept the dough from sticking to me and didn’t leave my hands covered in oil or flour.
This is a cool looking dough when you get to step 8 – it really is pillowy and jiggly. So cool that it inspired me to take a photo before I’d even conceived of this site. Check it out!

By the end of the 2 hour in-pan-rise (step 8 in the recipe), the dough will look huge and may lead you to wonder “am I making a pizza or a massive round loaf of bread.” Don’t worry — while it looks massive at this stage, the end product is surprisingly light and airy. Still, you could go a little under doubling the recipe for a 15 inch pan (see below, “Subs & Mods” for more).
The recipe says to put the oven rack on the bottom, which I did. My oven isn’t the best though and only has a heating element on the bottom. (I believe most ovens have one on the top and bottom.) In this instance, where you need more time to cook the dough before the toppings burn, the single bottom element worked to my advantage with the rack at its lowest setting.
The recipe says 18-20 minutes, but, likely due to my larger pan and belief in the benefits of excessive toppings, I went 22 minutes. The crust might have been able to go a minute or two more, but the toppings were maxed out and crust still came out fairly crispy.
One thing they mention at the end of the recipe that I discovered is key — run a knife around the cheese immediately after it comes out or it will adhere to the pan and may require damaging your crust to remove. Also, make sure the cast iron is truly well-seasoned. I guess mine had lost some from all the use as a baking steel.
Eating
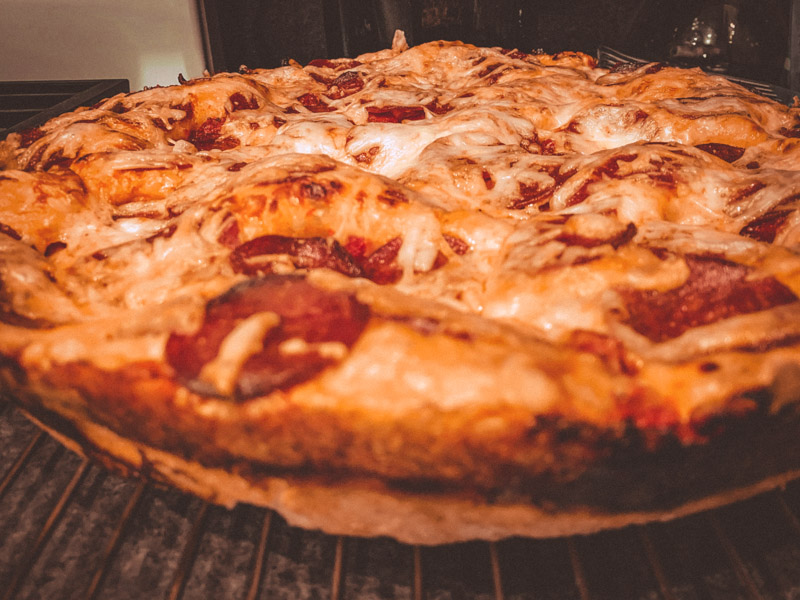
When my wife first saw the pizza, she expressed concern over the thickness of the crust, “This looks like it’s going to be really doughy.” The first time I made it, I shared her concern. However, as you may be sick of hearing at this point, it wasn’t. All the air you’ll incorporate by carefully following the folding instructions creates an airy crust. So, despite its height, the crust had a light and delicate texture, which balanced perfectly with the toppings.
The first time I made this, we were starving by the time it came out of the oven, so I just wanted 5-10 minutes to server it. However, as the recipe mentions, it was arguably better as it cooled down from the initial burn-the-roof-of-your-mouth temperature that we first tried it at. As you’d expect, the cool down takes longer because it’s “cooling” in a cast iron skillet.
Replacing kneading with a folding technique, combined with a second in-the-pan rise, led to a thick yet light and airy crust.
Day Two Reheat
Perhaps because I undercooked it slightly or maybe because the refrigerator removed excess moisture, the crust came out noticeably crisper when I reheated it on the second day. To store it, I removed it from the pan and wrapped it in foil. To reheat, I just put some olive oil in the same skillet, cranked up my oven, and monitored it closely.
Subs and Mods
My main advice here is to follow the recipe carefully, but here are a few things that I changed and learned.
The first time I made this, I used bread flour instead of all-purpose because that’s all I had. That was a mistake. It still came out well, and, if bread flour is all you have, go for it. But, in my second bake, I discovered that all-purpose IS better — crisper and more tender. And, since this dough is about a crisp and tender crust, all-purpose flour is the winner.
My cast iron skillet is a massive 15 incher. Utilizing my geometry skills for the first time since high school (actually, I had to use Google to remember how to do the calculation), I found that a 15 inch pan has a little more than double the area of a 9 or 10 inch pan. (If you want to check my work… my 15 inch has a radius of 7.5 inches because the radius is half the diameter, so to calculate the area: A = πr2 = π x 7.5 x 2 ≈ 176.71459. For a 10 inch skillet: A = πr2 = π x 5 x 2 ≈ 78.53982. Double to see where you’d be with two skillets instead of the one the recipe is made for: 2 * 78.54 = 157.08.) Based on this, I doubled the recipe. It turned out to be the perfect amount for my skillet. Since the area of my skillet is actually a little larger than the area of 2 ten inch skillets, I’d expect pizza following the original recipe to have a slightly thicker crust. As a 12 inch skillet covers over 40% more area, I would increase the recipe by at least 25% or 30% if you have a 12 inch skillet.
Removing max moisture from the sauce is ideal. The second time I made this, I drained the crushed tomatoes for a few minutes, then cooked them down to remove the residual moister. This kept crust crisper. Also, you should use a low-moisture cheese — not fresh mozz.
Of course, I added pepperoni. Always an improvement in my mind. And a requirement in my wife’s.
From the Comments
Nancy from CA suggests thinly sliced cheese as the first layer. Based on my experience with making Chicago style pizza using that technique and the goal of the first cheese layer (preventing moisture from getting to the crust), I’d say this sounds like an excellent idea. My one note would be to make sure it is truly thinly sliced because the standard pre-sliced cheeses you get at the store could weight the dough down, forcing the air out and ruining it signature light and thick crust.
If you’re in a hurry, Candy from CA says you can skip the 12 – 72 hour rise. I’m sure this works. However, if you have the time, I’d recommend the refrigerated rise. In addition to the complexity, it divides up the work so that you don’t have to do everything in one long marathon.
Multiple “thin crust people” said that they liked this recipe. Presumably because the airy dough eats a lot lighter than it looks.
Hillary from OH says that if you didn’t plan ahead, you can just buy a ball of Whole Foods pizza dough and use it instead. I’d agree with her that this defeats the entire purpose of following the recipe and can’t argue with “sometimes you gotta get dinner done fast.”
Wrap Up
That’s all I have. Thank you for reading. If you make this recipe and have thoughts, let me know in the comments. I’m always looking for ways to improve and also glad to assist with troubleshooting.